

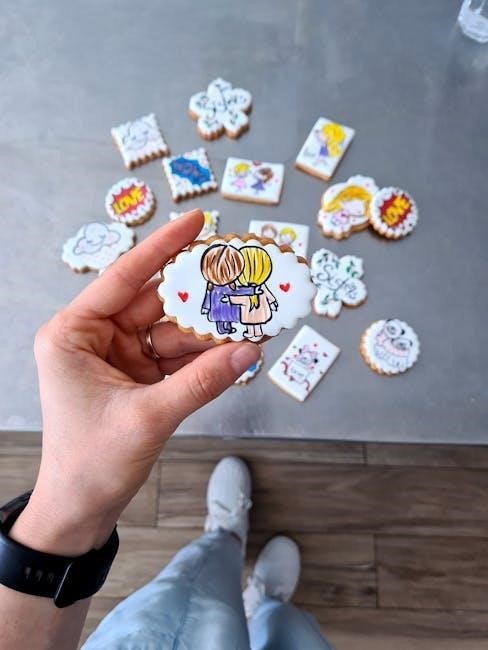
Paint Your Own (PYO) cookies are a fun and creative edible craft where cookies are pre-baked and decorated with edible paints, making them a popular activity for kids and adults alike.
1.1 What Are PYO Cookies?
Paint Your Own (PYO) cookies are pre-baked, undecorated sugar cookies featuring outlined designs. They allow users to paint and customize their own edible creations using food-safe paints or royal icing, making them a fun and interactive treat for all ages.
1.2 The Popularity of PYO Cookies
Paint Your Own (PYO) cookies have gained immense popularity as a fun, interactive, and customizable treat. They offer a creative outlet, allowing individuals to express their artistry while enjoying a delicious cookie. Suitable for all ages, PYO cookies are perfect for parties, gifts, or family activities, making them a beloved choice for those seeking a unique and engaging edible experience.
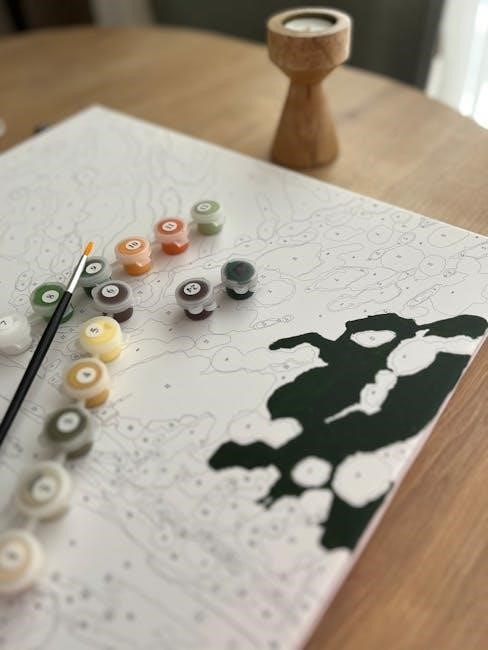
Materials and Supplies Needed
Gather essential ingredients like sugar cookie dough, confectioners’ sugar, and food-safe paints. Tools include brushes, stencils, and icing for base coating. Ensure all materials are food-safe and suitable for creative decorating.
2.1 Essential Ingredients for Cookie Dough
The basic ingredients for PYO cookie dough include all-purpose flour, baking powder, unsalted butter, granulated sugar, eggs, vanilla extract, and salt. These create a soft, sturdy base for painting. Confectioners’ sugar is used for royal icing, essential for decorating and adhering designs. Ensure all ingredients are fresh for optimal texture and flavor.
2.2 Edible Paints and Coloring Options
Edible paints are made from food-safe ingredients like gel or airbrush coloring mixed with vodka or water. These vibrant hues are applied using brushes or stencils. Airbrushing is a popular method for even coverage. Always ensure products are non-toxic and intended for consumption to maintain safety and quality in your PYO cookie designs.
2.3 Tools for Painting and Decorating
Essential tools include fine-tip brushes for detailed work and stencils for precise patterns. Airbrushes are ideal for smooth, even coverage. Scrapers and toothpaste-consistency royal icing are used for outlining. Clear bags with edible paint palettes prevent direct contact with cookies, ensuring a mess-free experience while creating intricate designs.
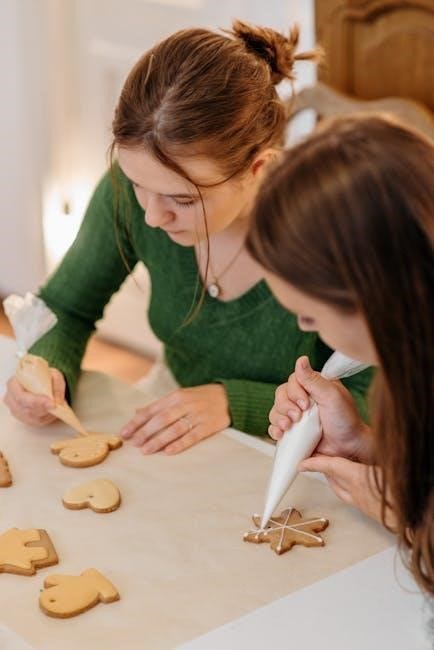
Preparing the Cookies for Painting
Preparing cookies involves baking and cooling them thoroughly. A base coat of royal icing is applied to create a smooth surface for painting, ensuring the designs adhere well.
3.1 Baking and Cooling the Cookies
Bake sugar cookies to a light golden brown, ensuring they are firm. Allow them to cool completely on a wire rack to prevent sogginess. For best results, bake chilled dough at 1/4-inch thickness. Proper cooling ensures the royal icing base adheres smoothly, setting the foundation for painting. Let cookies cool for at least 30 minutes before decorating.
3.2 Royal Icing for Base Coating
Apply a thin, even layer of royal icing to the entire cookie surface using a piping bag or spatula. This base coat ensures better paint adhesion and a smooth finish. Use 15-20 second icing consistency for optimal coverage. Allow the icing to dry completely, ideally for 8 hours or overnight, before painting for the best results and durability.
Painting Techniques for PYO Cookies
Explore various painting techniques like dry brushing for texture, stippling for details, and stencils for precise patterns, enhancing your creative expression on edible cookies.
4.1 Dry Brushing for Textured Effects
Dry brushing involves using a nearly dry brush to apply paint, creating unique textures on cookies. Lightly sweep the brush across the surface for a soft, matte finish or press harder for more defined patterns. This technique adds depth and visual interest, making it perfect for creating realistic effects like grass or stone.
4.2 Stippling for Detailed Designs
Stippling involves creating detailed designs using small dots of edible paint. Use a fine-tipped brush or toothpick to apply dots in patterns or layers. This technique allows for intricate designs, from facial features to floral patterns. Varying dot sizes and spacing can add depth and dimension to your cookie art, making it visually striking and professional-looking.
4.3 Using Stencils for Precise Patterns
Stencils are perfect for achieving precise, intricate designs on PYO cookies. Place a stencil over the cookie and apply edible paint or royal icing using a scraper or brush. Ensure the surface is dry for crisp results. Stencils are ideal for patterns like borders, flowers, or geometric shapes, allowing for professional-looking designs with minimal effort and maximum consistency.
Drying and Sealing the Painted Cookies
Allow painted cookies to dry completely to prevent smudging. Seal with food-safe sprays or coatings to protect designs and enhance durability for long-lasting results.
5.1 Allowing Paint to Dry Completely
Letting the paint dry completely is crucial to maintain the design’s integrity. Place cookies on a flat surface, away from direct sunlight, and allow them to air dry for several hours. Avoid touching or stacking until fully dry to prevent smudging or smearing, ensuring vibrant and lasting results on your painted cookies.
5.2 Sealing with Food-Safe Sprays or Coatings
After the paint is completely dry, apply a food-safe spray or coating to protect the design and add a glossy finish. This step ensures the cookies remain vibrant and are safe to eat. Use a clear, food-safe spray and follow the product instructions for proper application to preserve your artistic creations effectively.

Tips for Success
Patience and neatness are key to achieving professional-looking results. Work in thin layers and allow each layer to dry before adding more details for a polished finish.
6.1 Avoiding Common Mistakes
Common mistakes include overloading the brush with too much paint, which can lead to uneven coverage. Additionally, not allowing the base coat of royal icing to dry completely before painting can cause designs to smudge. To avoid these issues, use light strokes and ensure each layer is fully dry before adding more details or paint.
6.2 Ensuring Long-Lasting Designs
To ensure long-lasting designs on PYO cookies, allow each layer of paint and icing to dry completely before adding more details. Use high-quality, food-safe paints and sealants to protect the designs from smudging or fading. Proper sealing with edible sprays or coatings can also help maintain the vibrancy and durability of the artwork, making the cookies both decorative and long-lasting.
Making PYO Cookies Fun for Kids
Engage kids with PYO cookies by letting them explore their creativity through painting and decorating. This fun, hands-on activity allows children to express their artistic side while enjoying a tasty treat.
7.1 Simple Designs for Children
Start with easy designs like hearts, stars, or animals. Use stencils for precise patterns or let kids freestyle with washes and solid colors. These simple techniques allow children to enjoy the creative process while building confidence in their artistic skills.
7.2 Safe and Kid-Friendly Materials
Use non-toxic, food-safe paints and coloring options. Opt for washable, water-based edible paints or natural food dyes. Ensure all tools, like brushes and stencils, are clean and suitable for children. Avoid small parts that could be choking hazards. Always supervise kids during the painting process to ensure safety and fun.
Budget-Friendly PYO Cookie Ideas
Discover budget-friendly ways to create PYO cookies. Use affordable alternatives and DIY edible paints to make this activity cost-effective and fun for everyone.
8.1 Affordable Alternatives for Supplies
Use generic food colorings instead of specialized edible paints. Opt for homemade royal icing and repurpose household items like sponges or toothbrushes for painting. DIY edible paint can be made with food coloring mixed with a small amount of vodka or lemon juice. These budget-friendly options allow creativity without expensive tools or materials.
8.2 DIY Edible Paint Recipes
Make edible paint by mixing a few drops of food coloring with a small amount of vodka or lemon juice. For thicker paint, add corn syrup. This budget-friendly option allows customization of colors and is easy to store for future use. Use this homemade paint to decorate cookies creatively without specialized tools or expensive products.
Common Mistakes to Avoid
Common mistakes include overloading the brush with paint, not allowing proper drying time, applying too much paint, and using low-quality food coloring, which can ruin the design.
9.1 Overloading the Brush with Paint
Overloading the brush with paint is a common mistake that can lead to uneven coverage and messy designs. To avoid this, dip the brush lightly and wipe off excess paint on the edge of the palette. Using too much paint can cause it to pool or spread unpredictably, ruining the cookie’s appearance. Always start with a small amount and build up gradually for better control and precision in your designs.
9.2 Not Allowing Proper Drying Time
One of the most common mistakes is not allowing the paint or icing to dry completely before handling or serving the cookies. This can result in smudging, smearing, or damage to the design. Always let each layer dry fully, ideally for 24 hours, to ensure the designs remain vibrant and intact. Using a fan can help speed up the drying process without compromising the finish.
Paint Your Own cookies offer a creative and enjoyable experience for all ages. Seeing your finished, personalized designs is incredibly satisfying. Try this fun tutorial today—your masterpiece awaits! Happy painting!
10.1 Final Thoughts on PYO Cookies
Paint Your Own cookies are not just treats; they’re a creative outlet. This activity allows for personal expression and makes for memorable experiences. Whether for events or family time, PYO cookies bring joy and satisfaction. They’re a delightful combination of art and food that everyone loves. Perfect for all skill levels, PYO cookies are truly special.
10.2 Encouragement to Try the Tutorial
Give PYO cookies a try for a fun, creative experience! This tutorial guides you through an easy, rewarding process that’s perfect for all skill levels. Whether you’re crafting with kids or exploring a new hobby, PYO cookies offer endless possibilities. With simple steps and budget-friendly options, this activity promises delightful results and lasting memories for everyone involved.